In this article, we are going to learn how to interface/connect PIR Sensor or Passive Infrared Sensor to Arduino. We have written a tutorial on how to interface PIR sensor to 8051 previously in CircuitsToday! So a PIR sensor which is also known as Pyroelectric sensor or Passive Infrared Sensor is basically an electronic sensor employed in motion detecting applications. A PIR sensor detects or measures IR (Infra Red) radiations emitted by any object inside its field of view.
A PIR sensor is generally known to the world as motion sensor or motion detector. We can actually build motion sensors or motion sensing lights we get on market with the help of Arduino and PIR sensors. So this tutorial is also a beginning guide to build motion sensor or a motion detector based on arduino. Lets learn how to interface a motion sensor/detector to arduino!
Lets brief how a PIR sensor operates!
In a practical aspect, all objects emit heat energy in the form of radiation. The theory behind this concept is that all objects with a temperature above absolute zero ( absolute zero is -273.15 degree celsius or zero kelvin) emit heat energy in the form of radiation at infra red wavelengths (invisible to human eyes). These emitted infra red radiations can be detected with the help of electronics and this principle is employed in the design of a PIR sensor. A PIR sensor do not emit any kind of radiation for detection purposes but they just measure the infra red radiation emitted by other objects inside its field or range of measurement.
I hope you have got an idea behind the operating principle of PIR Sensor! Lets get to our job of interfacing PIR sensor to Arduino!
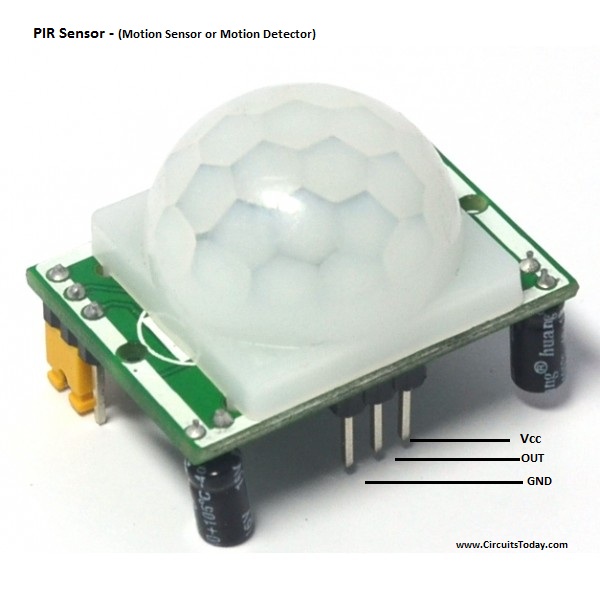
Assemble the circuit as shown in diagram given below. A PIR sensor module has only 3 pins – one is Vcc which is a +5 volts input, a ground pin and finally the digital output pin. Connect +5V from Arduino to Vcc of PIR sensor module, connect a GND from Arduino to ground of PIR sensor and finally connect the output pin (marked as ‘out’) to any digital pin of arduino. In our circuit diagram, we have connected it to pin 7 of arduino.
Possible outputs from PIR sensor module
The PIR sensor module has got only one digital output mode. So it has only 2 possible output values – either a HIGH or a LOW. By default standards, when there is no object inside the range of PIR sensor it outputs a LOW value or 0V at output. When an object is identified inside the range of PIR sensor it immediately outputs a HIGH value or +5V at output.
Interfacing PIR Sensor to Arduino – Circuit Diagram

The program and code to interface PIR sensor and arduino is as given below! If you find any difficulty in grasping the code, try reading our other interfacing articles to gain more insights!
The Program
int sensor=7; //The output of PIR sensor connected to pin 7
int sensor_value; //variable to hold read sensor value
void setup()
{
pinMode(sensor,INPUT); // configuring pin 7 as Input
Serial.begin(9600); // To show output value of sensor in serial monitor
}

void loop()
{
sensor_value=digitalRead(sensor); // Reading sensor value from pin 7
Serial.println(sensor_value); // Printing output to serial monitor
}
For More Details: Interfacing PIR Sensor to Arduino – Connect Motion Sensor/Detector to Arduino